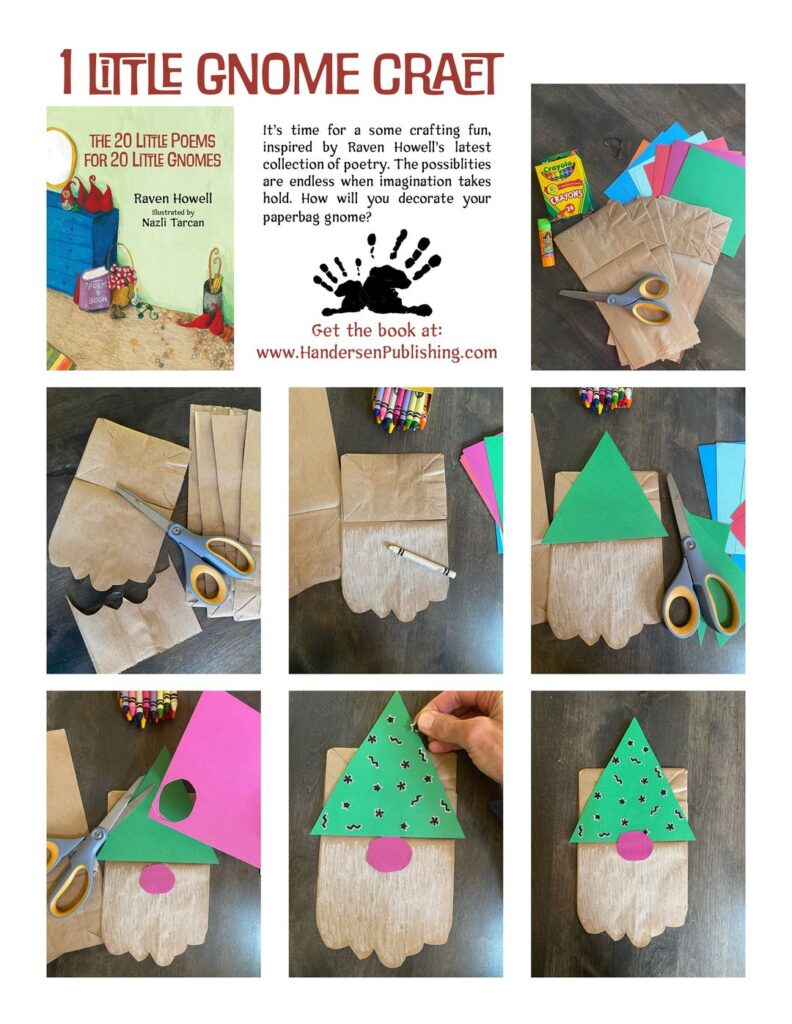
Today author Raven Howell is stopping by with instructions for a fun arts and crafts project that goes with her book, The 20 Little Poems for 20 Little Gnomes. Keep scrolling through the instructions to fina a visual step-by-step. Try this project when you want to add a little creativity to your day.
Arts and crafts – making fun gnomes for all ages, by Raven Howell
Somebody has the sniffles and is home from school for the day. It’s summer vacation and everyone is done playing outside. Your elementary school student needs a quick idea for an art project. It’s the holiday season and you’d like to make your own whimsical cards to send out. Perhaps you’re a librarian in need of a good activity to draw the middle schoolers for an after-school workshop. Whatever the circumstance, invite a gnome into your life and you’ll probably end up having fun!
Arts and crafts are good for everyone’s motor skills, but when you’re young, you can discover so much about yourself through a good artsy activity. I’m a big believer in art as a wonderful way to teach children that it’s okay to make seeming “mistakes” because there really aren’t any! At any age, if coloring, cutting, pasting, gluing, drawing, bending, or shaping construction paper gives you a sense of accomplishment, go for it.
Gnomes make fantastic arts and crafts projects because they are beloved by so many, and popular any time of year. Also, a gnome project is easy to assist a child with or do on your own without much fuss.
When my children’s picture poetry book, The 20 Little Poems for 20 Little Gnomes, was releasing I needed some type of activity to take along to elementary schools that I’d be visiting with my book presentations. Usually, I introduce myself to the classroom, I read, engage with the students, and we end up doing some type of hands-on activity together. I came up with a simple paper bag puppet craft. Here’s the scoop:
You’ll need:
Paper lunch bag (s)
Scissors
Crayons or paints
Glue
Medium to thick stock colored paper or good construction paper
- Lay your paper bag on the table so that the flap is up. Cut curves at the bottom of your bag. No need for them to be even – you’re creating your gnome’s beard.
- Color the bottom of your paper bag white– or any gnome color you’d like for his beard.
- Cut out a colorful triangle just wider than the paper bag to create his hat.
- Cut out a round or oval gnome nose in a different color using your colored paper stock.
- Glue the hat and nose on your paper bag.
- Now you’re free to decorate your gnome any way you wish. I used magical stickers that I placed on his hat.
- When you’re finished, remember to gently place your hand inside the paper bag to lift him for your gnome puppet!
For gnome crafts, the top “hat” part of the gnome is easy – some type of loose triangular shape. It can be cut out, decorated, and detailed to one’s age level. The beards are the fun stuff! You may use a small white paper plate half and cut slits into it vertically to create white beard hairs or try a simple handprint using white finger paint. Double up the handprint, turn it upside down, and your finger prints will be the beard strands. Yarn for beard looks really good, but then be ready to spend a little more effort with gluing.
Several options for the gnome nose are pom-poms, buttons, oval shaped stock paper cut-outs, and seashells. With gnomes, it’s not even necessary to create eyes. You’re placing the nose between the bottom middle of its hat and the beard. You can glue on google-eyes, but I find eyeless, the gnome remains a little mysterious.
For older children, we created gnomes from pinecones. I brought in strips of red felt which we cut on a diagonal/triangular. These are easily shaped into the cone-like hats, and then we rolled white play dough into small balls that we squished on as noses. Hardly any adult help was needed, and we had a couple dozen gnomes within a half an hour.
Remember to use arts and crafts as self-expression when you need it, and I hope a good-fortuned gnome inspires your creativity in the coming year!


